

Vermiculture Part I – the Set-up
Vermiculture is the intentional cultivation of worms. In gardens and farms, worms are raised and used to break down organic materials as part of a composting process called vermicomposting. Vermicomposting is the natural aerobic (oxygen-required) process of the decomposition of organic matter into soil using worms. Worms breakdown organic material into bioavailable components. These components are primarily solid organic matter (worm castings) and liquid leachate (worm tea). Both can be used as organic fertilizers. PoTAYtoe, PoTAHtoe. The set-up process for vermiculture and vermicomposting is essentially the same, the difference is a matter of intent. My primary intent is to raise worms because I care for Woodland box turtles that eat worms and I fish a lot. The tremendous up-side is free organic, odorless plant fertilizer/soil and the elimination of unused organic household material by composting. As a side note – I have cared for box turtles for over 25 years and they are registered with DWR in accordance with captive native reptile regulations.
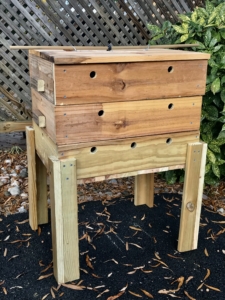
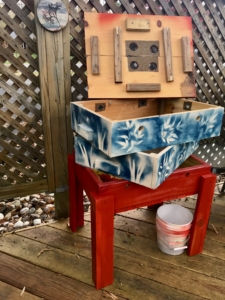
Three Tier Worm Box – Photo Jerry Nissley
Why Vermicomposting over traditional composting? Vermicomposting provides a faster, more efficient decomposition process. Worms can eat their weight in food daily. It is low odor so it can be done indoors and outdoors. The worms produce additional beneficial microbes as the organic material passes through their systems, which enriches the castings.
I contacted Melina Ciensk (FMN Chapter co-advisor) after I read that she ran a vermicomposting program at Occoneechee State Park. She shared her program handouts and presentation with me, which summarize the program and provided tips on how to get started. Her material was a very helpful resource for developing a plan of action for this home project.
The Essentials of Vermiculture:
I am sure most Master Naturalists and Master Gardeners are familiar with the benefits of composting so I will not belabor that aspect. Instead, we will focus on the practical aspects of establishing a home Vermiculture system.
Worms can be used in composting piles or composting bins. The former is typically a large pile in your backyard used specifically for creating organic compost, verses a smaller, more contained ‘bin’ used primarily for raising worms. As mentioned earlier, my intent is to raise worms, so I built a 3-tiered ‘worm box’.
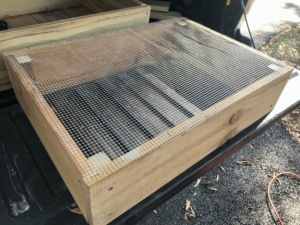
Two upper tiers have screened floors – photo Jerry Nissley
Vermiculture bins a.k.a. worm boxes or bins, come in all shapes and sizes. Choosing one depends on your needs and space. I chose to build a wooden box because I had some extra, untreated wood remaining from another project. Plastic bins are popular and are readily available for purchase or DIY.
In a tiered box system, the worm colony is introduced into the lowest tier along with the proper bedding material and chopped food scraps. Once the colony processes the first-tier material, the second tier is added. The bottom tier has a solid bottom, covered with plastic and has a drain. All tiers have side holes for airflow.
The second tier then becomes the ‘feeding’ tier and the worms migrate up through the screen floor to feed. Repeat for top tier. The worms sense where the food is and always migrate to the tier with food.
Conceptual Vermiculture Bin – graphic open source
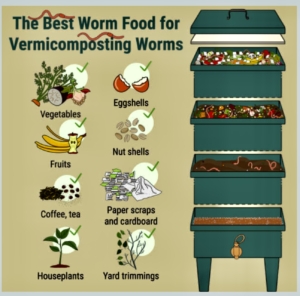
Knowing what to add to your worm-bin is crucial for the creation of high-quality compost, healthy worms, and preventing problems:
• Green Materials (Nitrogen-Rich): non-citrus fruit and vegetable scraps, coffee grounds, fresh clean grass clippings, and plant trimmings add necessary nitrogen to your mix.
• Brown Materials (Carbon-Rich): Dry leaves, straw, small wood chips, shredded paper, and cardboard provide carbon. A proper balance of greens and browns is essential for a healthy, odor-free bin. The carbon materials also help maintain moisture.
• Water: Keep the compost moist, but not soaked. Some moisture is necessary for the decomposition process.
• Avoid composting meats, dairy products, oils, and diseased plants as they can attract pests and pathogens. Be cautious of adding weeds that may have pesticides, seeds or invasive roots.
Stacked tiers will eventually be full of castings. Lid has holes to allow water in. Photo Jerry Nissley
The location of the worm bin can significantly impact its success. Ensure the spot is easily accessible year-round. You will want to add materials and harvest compost regardless of the season. An outside worm bin may need additional protection in the winter.
• Sunlight: While not mandatory, a location with partial sunlight can help warm the contents and speed up the composting process. However, too much sun might dry out the bin, so balance is key.
• Drainage: Good drainage is essential to prevent your compost from becoming waterlogged and drowning the worms. An area with a slight incline or well-drained soil can be advantageous.
• Proximity to Materials: Ideally, it should be near the source of your compost materials to minimize the effort required to transport scraps. Easy is as easy does.
By selecting an ideal location, choosing the right type of bin, and knowing what materials to compost, you are now equipped to start your Vermiculture adventure!
The success of your worm bin largely depends on the type of worms used. I will not add worms until the spring because my turtles are brumating and it is too cold to fish. More importantly, I will have the entire spring and summer to establish the colony before they must winter over.
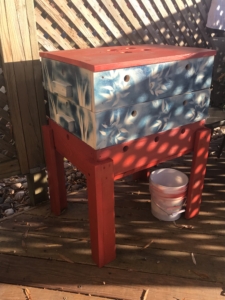
Finished box. Painted exterior only. Drain to be added. Photo Jerry Nissley
The most popular worm choices are Red Wigglers and European Nightcrawlers for their complementary abilities. I plan to introduce both (500 and 100, respectively).
• Red Wigglers (Eisenia fetida): These are the champions of vermicomposting. They thrive by decomposing organic material, they reproduce quickly, and tolerate a wide range of temperatures. They live in the top few inches of the soil eating away at the organic material.
• European Nightcrawlers (Eisenia hortensis): Larger than red wigglers, these worms are also effective composters and are known as excellent bait worms for fishing. Nightcrawlers tunnel deeper into the soil, which aerates the layer, keeps it from compacting, and improves drainage.
• It is important to note that ordinary garden earthworms are not ideal for worm composting as they have different habitat preferences.
Most importantly, always check worms purchased from any supplier to make sure the batch is not contaminated with Asian Jumping Worms before introducing them into a compost.
Once established this three-tiered, 22” by 18” boxset is reportedly able to create 30-40 pounds of usable organic garden material per year. Red wigglers are hermaphrodites, so they can reproduce at a fast rate; they produce eggs (cocoon) often and are able to mate multiple times per year. A cocoon is about an 8th of an inch wide, yellow, and takes around 21 days to develop before hatching. If the cocoon is successful, 2-3 new worms should emerge. These new worms will grow to sexual maturity in around 40 days and will be able to mate and produce egg cocoons weekly. With adding an initial 600 worms, I cannot even do the math for how many worms could be in the box by the end of the year.
We will see. To be continued…
References:
1. Kiss the Ground – Documentary on Netflix that explores healing the world’s soils through regenerative agriculture. Highly recommended
2. Jim’s Worm Farm – Worms and Vermicomposting supplies; resource information library
3. Melina Cienski, Community Forestry Specialist Rappahannock District; FMN Chapter Co-Advisor

